Alinan 4pcs ESP8266 NodeMCU CP2102 ESP-12E Internet WiFi Development Board Open Source Serial Wireless Module for Arduino IDE/Micropython (ESP-12E)
当サイトをご覧頂き誠にありがとうございます。弊社商品は全て正規店からの新品・並行輸入品です。税関手続・関税払いは全て弊社で対応の上、全国送料無料でお届けします。弊社海外倉庫より国内に発送しますので、お届けまで2-15営業日程度お時間を頂いております。税関検査により無作為に開封された場合、ごく稀に外箱に損傷が生ずる場合がありますが、商品自体の品質には問題ございませんのでご安心ください。(商品が電波法上の技術基準に適合する必要がある無線機器の場合:商品は並行輸入品のため、電波法上の技術基準に適合致しません。日本国内で使用すると電波法に違反する恐れがありますので、ご購入・ご使用には十分ご注意ください)
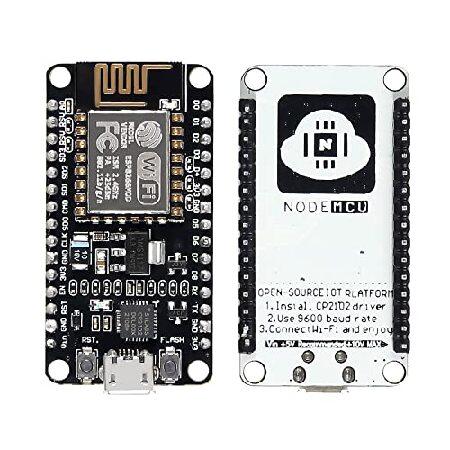
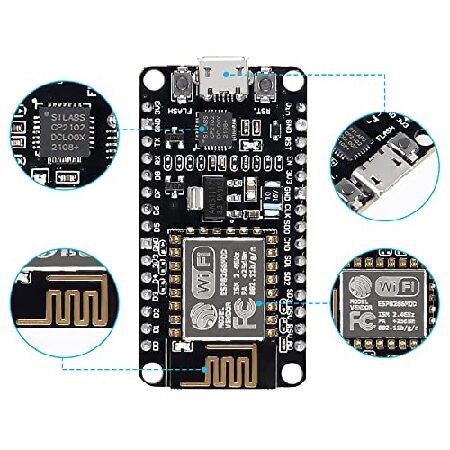
Built-in Micro-USB, with flash and reset switches, easy to program
Full I/O port and Wireless 802.11 supported, direct download no need to reset
The chip model: CP2102; There is the way to guide you to use the new version:
The command you needed to use is: esptool.py --baud 115200 --port /dev/tty.SLAB_USBtoUART write_flash -fs 32m -ff 80m --flash_mode dio 0x00000 boot_v1.7.bin 0x1000 user1.bin 0x37c000 esp_init_data_default.bin 0x37e000 blank.bin The important part is “?flash mode dio” https://github.com/espressif/esptool/wiki/SPI-Flash-Modes;
Instruction & Steps of How to use:
1. Download the Compatible with Compatible with Arduino IDE, the latest version.
2. Install the IDE
3. Set up your Compatible with Compatible with Arduino IDE as: Go to File->Preferences and copy the URL below to get the ESP board manager extensions: http://arduino.esp8266.com/stable/package_esp8266com_index.json Placing the http:// before the URL lets the Compatible with Compatible with Arduino IDE use it...otherwise it gives you a protocol error.
4. Go to Tools > Board > Board Manager> Type "esp8266" and download the Community esp8266 and install.
5. Set up your chip as: Tools -> Board -> NodeMCU 1.0 (ESP-12E Module) Tools -> Flash Size -> 4M (3M SPIFFS) Tools -> CPU Frequency -> 80 Mhz Tools -> Upload Speed -> 921600 Tools-->Port--> (whatever it is)
6. Download and run the 32 bit flasher exe at Github(Search for nodemcu/nodemcu-flasher/tree/master/ at Github) github.com/nodemcu/nodemcu-flasher/tree/master/Win32/Release Or download and run the 64 bit flasher exe at: github.com/nodemcu/nodemcu-flasher/tree/master/Win64/Release
7. In Compatible with Compatible with Arduino IDE, look for the old fashioned Blink program. Load, compile and upload.
8. Go to FILE> EXAMPLES> ESP8266> BLINK, it will start blinking.
当サイトをご覧頂き誠にありがとうございます。弊社商品は全て正規店からの新品・並行輸入品です。税関手続・関税払いは全て弊社で対応の上、全国送料無料でお届けします。弊社海外倉庫より国内に発送しますので、お届けまで2-15営業日程度お時間を頂いております。税関検査により無作為に開封された場合、ごく稀に外箱に損傷が生ずる場合がありますが、商品自体の品質には問題ございませんのでご安心ください。(商品が電波法上の技術基準に適合する必要がある無線機器の場合:商品は並行輸入品のため、電波法上の技術基準に適合致しません。日本国内で使用すると電波法に違反する恐れがありますので、ご購入・ご使用には十分ご注意ください)
カテゴリー:
メーカー: Alinan
ブランド: Alinan
高さ: 11.3 センチ
幅: 8.1 センチ
奥行: 4.1 センチ
重量: 0.0 Kg


- Compatible with Arduino, works great with the latest Compatible with Arduino IDE/Mongoose IoT/Micropython.
- SP8266 is a highly integrated chip designed for the needs of a new connected world. It offers a complete and self-contained Wi-Fi networking solution, allowing it to either host the application or to offload all Wi-Fi networking functions from another application processor.
- The Chip Model: CP2102; There is the way to guide you to use the new version: The command you needed to use is: esptool.py --baud 115200 --port /dev/tty.SLAB_USBtoUART write_flash -fs 32m -ff 80m --flash_mode dio 0x00000 boot_v1.7.bin 0x1000 user1.bin 0x37c000 esp_init_data_default.bin 0x37e000 blank.bin The important part is “?flash mode dio”
Built-in Micro-USB, with flash and reset switches, easy to program
Full I/O port and Wireless 802.11 supported, direct download no need to reset
The chip model: CP2102; There is the way to guide you to use the new version:
The command you needed to use is: esptool.py --baud 115200 --port /dev/tty.SLAB_USBtoUART write_flash -fs 32m -ff 80m --flash_mode dio 0x00000 boot_v1.7.bin 0x1000 user1.bin 0x37c000 esp_init_data_default.bin 0x37e000 blank.bin The important part is “?flash mode dio” https://github.com/espressif/esptool/wiki/SPI-Flash-Modes;
Instruction & Steps of How to use:
1. Download the Compatible with Compatible with Arduino IDE, the latest version.
2. Install the IDE
3. Set up your Compatible with Compatible with Arduino IDE as: Go to File->Preferences and copy the URL below to get the ESP board manager extensions: http://arduino.esp8266.com/stable/package_esp8266com_index.json Placing the http:// before the URL lets the Compatible with Compatible with Arduino IDE use it...otherwise it gives you a protocol error.
4. Go to Tools > Board > Board Manager> Type "esp8266" and download the Community esp8266 and install.
5. Set up your chip as: Tools -> Board -> NodeMCU 1.0 (ESP-12E Module) Tools -> Flash Size -> 4M (3M SPIFFS) Tools -> CPU Frequency -> 80 Mhz Tools -> Upload Speed -> 921600 Tools-->Port--> (whatever it is)
6. Download and run the 32 bit flasher exe at Github(Search for nodemcu/nodemcu-flasher/tree/master/ at Github) github.com/nodemcu/nodemcu-flasher/tree/master/Win32/Release Or download and run the 64 bit flasher exe at: github.com/nodemcu/nodemcu-flasher/tree/master/Win64/Release
7. In Compatible with Compatible with Arduino IDE, look for the old fashioned Blink program. Load, compile and upload.
8. Go to FILE> EXAMPLES> ESP8266> BLINK, it will start blinking.
当サイトをご覧頂き誠にありがとうございます。弊社商品は全て正規店からの新品・並行輸入品です。税関手続・関税払いは全て弊社で対応の上、全国送料無料でお届けします。弊社海外倉庫より国内に発送しますので、お届けまで2-15営業日程度お時間を頂いております。税関検査により無作為に開封された場合、ごく稀に外箱に損傷が生ずる場合がありますが、商品自体の品質には問題ございませんのでご安心ください。(商品が電波法上の技術基準に適合する必要がある無線機器の場合:商品は並行輸入品のため、電波法上の技術基準に適合致しません。日本国内で使用すると電波法に違反する恐れがありますので、ご購入・ご使用には十分ご注意ください)
カテゴリー:
メーカー: Alinan
ブランド: Alinan
高さ: 11.3 センチ
幅: 8.1 センチ
奥行: 4.1 センチ
重量: 0.0 Kg